Showing posts with label Recipe. Show all posts

Monday, August 29, 2011

Recipe – Banana Vanilla Milkshake


     Yippee! Summer has almost come to its end and the beautiful fall soon takes over it. BTW, do you wanna celebrate the last summer delight? Try the banana vanilla milkshake. COOL! It was my first DIY of milkshake and I can’t wait to share with you how smooth and tasty this could be.

Never grow old with banana & milk.

     If I mention how banana and milk can boost our health in this passage, than it is not a passage but a complete health essay. But do notice that though banana has been doubted that it contains calories and large amount of energy, the balanced diet means much more. Banana is a rich source of iron, and thus it can help energize us. If you really care about the calories, do use skimmed milk instead of whole milk.


Ingredients:
  • 1 frozen ripe banana, slice it and blend or beat it with spoon
  • 200 ml whole or skimmed milk
  • 3 tsp vanilla ice cream
  • 100g yogurt

Method:
1. Either prepares your blender or milkshake mixer.
2. Put banana, ice cream, milk, yogurt into the blender or mixer. (If you are using a blender, than you can put in banana chunks rather than beaten banana jam.)
3. Turn the machine on and let ingredients combine together.
4. Stop after all the stuffs are well mixed.
5. Pour into glasses and serve.


Time:
Prep: 10 mins
Process: 4 mins

Yield: serves 2 to 3


A blender or a milkshake mixer:
    For my experience, I do prefer using the more professional and mild mixing technique with a milkshake mixer.
    A blender can mix all the things quickly, but it is the milkshake mixer that can give you a total enjoy of smoothness.


LOOK! How nice the bubbles are there! Perfect mixture that you can’t see the banana but they are there!

Enjoy your homemade flavor!
Remember:
1.      Yogurt can be replacement of sugar as well as enhancement of thickness and smoothness.


If you tried, don’t hesitate to share. Picture? Words? Essays? WELCOME!
Have difficulties? Let me help you. 

Recipe – Celery Carrot Apple juice


    The nutrition booms when celery, carrot and apple are combined together. Sure you have already heard about all the benefits that those veges and fruits can give, so you definitely want have to try this. The mixture enhances the flavor as well as the effect of keeping out coronary heart diseases. The precious great amount of vitamin A, C, K is found in this juice, too. I think we should share the natural beauty of natural unprocessed vegetables and fruits.

Handmade IS better than takeaway.

    The portion of combination could be flexible. I’m not sure which is preferred by you. For me, I like carrot best so I just let the juice be filled with carrot. Of course, the truth is, when you add carrot, the color is there.
    Celery is for both flavor and nutrition, but not a perfect match for how the juice looks. The fact is it would slightly turn the pure red into deep red. So, the recommended portion of celery to carrot would be 1:2.


Ingredients:
  • 3 stalks of celery
  • 1 large carrots
  • 1 large apple
  • Some pure water
  • 2 tsp honey


Method:
1.      Wash the fruit and vegetables with water. A stiff vegetable brush would be preferred to clean with. Keep the leaves on the celery, but remove the carrot tops.
2.      Core the apple.
3.      Mix honey with a glass of water.
4.      Prepare some pure water to add to the blender.
5.      Slice all the things to fit your juicer.


Time:
Prep: 10 mins
Process: 5mins

Yield: serves 2 to 4


Adding water is important
   Some people just think the combination is too thick with too much celery and carrot fibre and the taste is strong.

Serve without sediment
    I don’t know whether you would like to drink all the things together. Certainly, doing so can better grasp all the nutrition of the blend. However, your mouth could be filled with bits of celery, carrot and apple. So I would recommend serving without sediment.

Enjoy your homemade flavor!
Remember:
1.      Keep trying and you will blend your new flavor. You may use other combination as well. Celery and carrot are two basic vegetable juice content.

If you tried, don’t hesitate to share. Picture? Words? Essays? WELCOME!
Have difficulties? Let me help you. 

Sunday, August 14, 2011

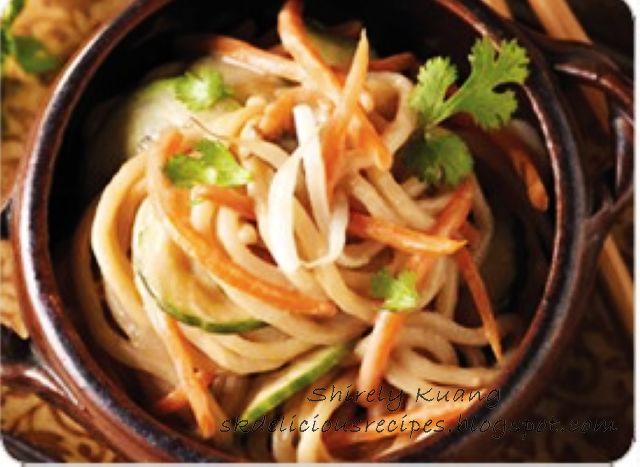
Recipe – Cold Dish – the Shanghai Salad – Cooked to be fresh!


     Generally, we Chinese are not used to having salad during our meals. But this doesn’t make us don’t know what is cold dish and salad. This dish is gonna impress you. I’m Cantonese but I also suggest this – the Shanghai Salad. Definitely worth a try! Maybe you’ve already got some ideas about this dish from the picture. Are they all raw? Nope!

Salad tastes FRESH, not RAW.

If you’ve read most of my recipes, you may see that I always emphasize on the flexible matching of different ingredients in a dish. This time, you have to make your choice that whether to put chicken, shrimp or even noodles as the main ingredient into this cold dish.
I prefer the chicken one for I’m still a rookie in using knifes in US, which is completely different from what I use in China. To chop those raw shrimps can be too difficult and sometimes they look bad after a long time preparation.

Shanghai Shrimp Salad


Ingredients:
  • 1/2 chicken or chicken thigh, cut to small pieces, don’t dice. COOKED
  • 2 ¼ lbs. ramen noodles, crumbled
  • 12 oz. slivered almonds, toasted
  • 3 lbs. Chinese or Napa cabbage, shredded
  • 12 oz. red or green bell peppers, chopped
  • 5 lbs. boneless, skinless chicken breast, COOKED, cubed
  • 4 ½ qts. black beans, drained (1 ½ 10# cans)
  • Vegetable cooking spray


Seasonings:
  • 1 tsp light soy sauce
  • 2 2/3 cups rice wine vinegar
  • 2 cups sugar
  • 1 cup reduced-sodium soy sauce
  • 1 cup sesame oil, or more to taste
  • 1 cup honey

Method:
1. For the Dressing: Combine all dressing ingredients in a medium bowl, whisking until sugar is dissolved. Reserve.
2. For the Salad: Place ramen noodles on large baking sheets; spray with vegetable cooking spray. Bake at 350°F, stirring occasionally, until lightly browned, about 5 minutes. Cool.
3. To Assemble: At serving time, combine toasted ramen noodles, almonds, vegetables, chicken and beans. Toss with dressing and serve.

Time:
Prep: 20 mins
Cook: 8mins

Yield: serves 2 to 3

Knifes for cold dish:
    All of us know we should use different knifes to cut raw food and cooked food. Usually, cooked food needs a knife with less stain and no rust to cut because we eat the food right after the cutting.

Perhaps I should suggest you a relatively new kind of knifes, the ceramic knifes. Well, I don’t know whether you guys in US will buy and use this for this kind of knife is brought by a Japanese ceramic manufacturer first. Now, in China, many knife makers do so with lower cost. So, the price is nothing to worry about. The Santoku one is the kitchen knife for general use. If you want to use it daily, buy this kind.

    Recently I found a ceramic knife kit of 2 ceramic knifes on Amazon, sold at $75. As I told you, the Japanese maker sells with high price so what I bought last time was a cheaper one made in China, click to see, $17.


Good knifes do cut.

Enjoy your homemade flavor!
Remember:
1.      Cooking time would be slightly varied between different cooking wares.
2.      Chinese dish can have a flexible ingredient proportion. Keep trying and you will cook your new flavor. You may use other seasoning as well.


If you tried, don’t hesitate to share. Picture? Words? Essays? WELCOME!
Have difficulties? Let me help you. 

Wednesday, August 10, 2011

Dessert – Not only bake cakes by oven!


       Last time, I shared my experience on blog that I made the B-day cake for my mom. Here again, I show you how to baked cakes in a rice cooker.
Last month, I used my rice cooker instead of cooking rice in it, I baked an orange cake! Yes! I BAKED a cake in it – not steamed, not boiled.

When I saw the recipes in Internet, I wasn’t having any expectations of cakes baked in a rice cooker. But I was really amazed by the fluffy cakes texture that were evenly cooked throughout –a perfectly normal looking and tasting cake as we would have it if it was baked in an actual oven! It’s just little burned and little hard bits at the bottom :P, but tasty!


Ingredients:
5 eggs
180gm self-raising flour, sifted
1 tsp baking powder
100gm castor sugar
50gm oil
1 orange, finely grated zest
3 tbsp orange juice

Method:
1. Beat the eggs and caster sugar under high speed until fluffy, about 15 mins.
2. Add the orange zest and orange juice. Gently fold in the sifted flour and baking powder with plastic spatula.
3. Pour in the sunflower oil and mix well with spatula.
4. Using spatula, transfer the batter into inner pot of rice cooker.
5. Bake the cake using "quick cook" menu.
6. About 20 mins, it’ll turn to “thermal insulation”, keep warm half hours, and then use “quick cook” again. After it is finished, keep warm about 30 mins.
7. When it is done, leave it cool. Upside turns the pot to leave the cake bottom-up on a big plate.


The hand-mixer I used:

In my hand, it was a 5-speed hand mixer and I think 5-speed is enough for ordinary use for rice cooker cakes and cupcakes for the foam can be beaten not as smooth as those made by bakeries.
The other picture is a 5-speed hand mixer I found in a website that is not so famous but sells products with reasonable price and receives positive reviews. Moreover, this hand mixer sold with two chromed beaters & hooks which can save additional time and money to buy another pair. $20 for this and $40 for Cuisinart. It also has the instruction manual to download right below the description. I read this and I think it okay.

I also found several cupcakes recipes, maybe next time I’ll try to make rice cooker cupcakes! Which flavor do you like most? Let me know!


Enjoy your homemade flavor!
Remember:
1. Cooking time would be slightly varied between different cooking wares.
2. Dessert can have a flexible ingredient proportion. Keeping trying and you will cook your new flavor.


If you tried, don’t hesitate to share. Picture? Words? Essays? WELCOME!
Have difficulties? Let me help you. 

Recipe-Stir-fried shrimps with green peas and eggs

    Shrimps are not weird to be fried in both US and China. What’s more, I was so surprised that stir-fried shrimps in CA are much more delicious than in China for the shrimps are bigger, fresher and tastier. One thing that I should mention is the shrimp itself can really make the difference. I’d like to choose those plump big ones with shells even if they should be stored in fridges in markets. But I still prefer Chinese way of cooking for it is much simpler. I tried this recipe when I was in LA nearly a month ago. For I am such a shrimp addict, and it is still hot summer, I think it is good to share how to make this stir-fried dish with frying pan or wok.

Remember: Shrimps can be stir-fried with light flavor while lobsters and prawns can be eaten with cheese and added other richer flavor.


Ingredients:
  • 1/2 pound raw shrimp, shelled or not and deveined and patted very, very dry
  • 1/4 cup frozen peas, thawed
  • 4 eggs, beate

Seasonings:
  • 1/4 teaspoon salt
  • freshly ground black pepper
  • 1/2 teaspoon cornstarch
  • 1/2 teaspoon sesame oil
  • 1 teaspoon finely minced garlic
  • 1 large mild chili (anaheim, Hungarian wax), thinly sliced
  • cooking oil
  • 3/4 teaspoon salt
*Soy sauce, chili pepper, curry would also make it better

Time:
Prep: 20 mins
Cook: 10 mins

Yield: serves 2 to 3

There are many other kinds of stir-fried shrimps but I think this dish is with attractive look, which can stimulate the appetite and can serve guests.
   For myself, I’d like shrimps to be fried in a wok but not a deep trying pan. However, using a pan can really fry without the wok turner.

   I also suggest frying shrimps with their shells because the color will be much brighter than they are not.


Without shell


Enjoy your homemade flavor!
Remember:
1.      Cooking time would be slightly varied between different cooking wares.
2.      Chinese dish can have a flexible ingredient proportion. Keeping trying and you will cook your new flavor. You may use other seasoning as well.


If you tried, don’t hesitate to share. Picture? Words? Essays? WELCOME!
Have difficulties? Let me help you. 

Thursday, August 4, 2011

Soup-Corn and Carrot Soup

      Cooking the corn and carrot soup in Guangzhou, my hometown, using the slow cooker of the Chinese kind, I came up with that once I have the oxtail soup in one of my classmates’ home and her family cooked the soup also with a slow cooker.
At that time, I puzzled. The fact I first realized is that westerners also have the slow cooker which varies a lot with ours. I think the translation from Chinese to English should be improved, at least about this cook ware.
BUT I can’t tell clearly what their differences were and how they worked differently. After sharing this recipe, I will write a comparison and product review on this topic. Here I’ll show you one common Cantonese simmering soup, also known as long-time cooked soup. The corn and carrot soup can be of different tastes using different cook wares! How essential the wares are?


Left is western, right is Chinese.


Ingredients:
  • 1 pearl corn, chopped into 1" length
  • 1 carrot, peeled and cut into pieces
  • 300g pork ribs or tail bones, chopped into pieces
    spring onion, chopped (for garnishing)
  • 1.5L of hot boiling water

Seasonings:
  • 1 tsp salt
  • Several pieces of ginger
Method:
1. No need to bone out the ribs or tail bones. Just leave them boiled together.
2. Put everything in the slow cooker, except salt. Leave the soup boiling.
3. You can add other seasoning but please don’t make this a creamy soup in a slow cooker.


Time:
Prep: 10 mins
Cook: 30 mins to 1½ hours

Yield: serves 2 to 3

    This soup’s look is far simpler than the rich flavor. The purple clay cooking pot of the Chinese slow cooker can enrich the flavor. If you can have one, you will certainly admire the beautiful red pot. The reason for this is the clay can balance the heat and preserve the steam so that to contract the entire flavor together. Amazing huh?
    I know the Chinese slow cooker may be not so easy to find, but I will try to search the Internet and provide a referral link to you and let you also enjoy home-making of Chinese soup.

Enjoy your homemade flavor!
Remember:
1.      Cooking time would be slightly varied between different cooking wares.
2.      Chinese dish can have a flexible ingredient proportion. Keeping trying and you will cook your new flavor. You may use other seasoning as well.


If you tried, don’t hesitate to share. Picture? Words? Essays? WELCOME!
Have difficulties? Let me help you. 

Sunday, July 31, 2011

Recipe-Dish-Steamed Chicken with Black Fungus 木耳蒸鸡


     A quite familiar steamed dish to almost all southerners in China might be the Steamed Chicken with Black Fungus. As a student, I should say, in my hometown, all restaurants in primary shools, junior middle schools, senior high schools and universities provide this and can do this right, though they may not cook so well generally. Besides, at home, mama cooks this well with dates and mushrooms. In my life, this is a never-miss. Thanks to the Chinese food shop I found here, I can have ingredients like black fungus and dates altogether. I just can’t wait to introduce you the recipe for this.

Enjoy the fun Fun FUNGUS!

Ingredients:
  • 1/2 chicken or chicken thigh, cut to small pieces, don’t dice
  • 3 slices ginger, stacked and sliced thinly
  • a handful of dried black fungus, soaked in water, drained and cut to strips, add more if you like
  • Dates, lycium and mushrooms help perfect the color and flavor, add some as you like, also soak in water first


Seasonings:
  • 1 tsp light soy sauce
  • ½ tsp salt
  • ½ tsp corn flour
  • ½ tsp sugar
  • 1 tsp sesame oil
  • 1 tsp Chinese wine (Rice wine or Shaoxing wine)
  • A little pepper will induce the flavor
Method:
1. Combine chicken with black fungus and seasonings in a deep plate. Put the dish in refrigerate covered for at an hour or just put it in ordinary temperature is OK.
2. Scatter sliced ginger, dates, lyceum and mushrooms over the chicken.
3. Steam at high heat for about 15-20 minutes, until the chicken is cooked. Serve with white rice.

Time:
Prep: 20 mins
Cook: 15 mins

Yield: serves 2 to 3

    Since this is a steamed dish, it may get lots of water in plate. Don’t pour those liquid out because the essence of chicken and other seasoning is in it. 1tsp or so, the sauce can light up your bowl of pure white rice.
    Someone will ask how to steam this. There are various solutions. For me, for the sake of saving electricity, I usually use my rice cooker to cook the rice and a small dish of this together by putting it on a steam tray.

Enjoy your homemade flavor!
Remember:
1.      Cooking time would be slightly varied between different cooking wares.
2.      Chinese dish can have a flexible ingredient proportion. Keeping trying and you will cook your new flavor. You may use other seasoning as well.


If you tried, don’t hesitate to share. Picture? Words? Essays? WELCOME!
Have difficulties? Let me help you. 

LinkWithin (you may also llike)

Related Posts Plugin for WordPress, Blogger...